Kubernetes namespaces and Services

Hi there! I'm Ojas Jawale, a passionate Cloud, DevOps and Cyber Security enthusiast. I love to dive into the latest new technologies and sharing my journey through blog. I'm always eager to learn and grow in this ever-evolving field of DevOps and Cyber Security. You'll find me writing about CI/CD pipelines, automation, containerization with Docker, and other exciting tech topics related to software quality and deployment. My goal is to demystify complex DevOps and Cyber Security concepts, provide practical tips on automation and testing, and inspire others in the developer and operations community. Let's connect, learn, and build amazing, high-quality software together!
Kubenetes namespaces
In Kubernetes, namespaces provide a mechanism for isolating groups of resources within a single cluster.
Names of resources need to be unique within a namespace, but not across namespaces. Namespace-based scoping is applicable only for namespaced objects (e.g. Deployments, Services, etc.) and not for cluster-wide objects (e.g. StorageClass, Nodes, PersistentVolumes, etc.).
When to Use k8s namespace?
Namespaces are intended for use in environments with many users spread across multiple teams, or projects. For clusters with a few to tens of users, you should not need to create or think about namespaces at all. Start using namespaces when you need the features they provide.
Namespaces provide a scope for names. Names of resources need to be unique within a namespace, but not across namespaces. Namespaces cannot be nested inside one another and each Kubernetes resource can only be in one namespace.

Task 1 : Dealing with k8s namespaces
Create a Namespace for your Deployment
Use the command
kubectl create namespace <namespace-name>to create a NamespaceUpdate the deployment.yml file to include the Namespace
Apply the updated deployment using the command:
kubectl apply -f deployment.yml -n <namespace-name>Verify that the Namespace has been created by checking the status of the Namespaces in your cluster.
Get namespace in cluster
kubectl get ns

- Now create new namespace,
kubectl create namespace demo

- Update the deployment.yml file to include the Namespace,
apiVersion: apps/v1
kind: Deployment
metadata:
  name: todo-app
  namespace: demo
spec:
  replicas: 3
  selector:
    matchLabels:
      app: todo-app
  template:
    metadata:
      labels:
        app: todo-app
    spec:
      containers:
      - name: todo-app
        image: ojasjawale/node-app:v1
        ports:
        - containerPort: 8000
        # Define liveness and readiness probes for auto-healing
        livenessProbe:
          httpGet:
            path: /health
            port: 8000
          initialDelaySeconds: 30
          periodSeconds: 10
        readinessProbe:
          httpGet:
            path: /health
            port: 8000
          initialDelaySeconds: 30
          periodSeconds: 10

- Verify that the Namespace has been created by checking the status of the Namespaces in your cluster.

- Deployment has been created in namespace called
demo.
Task 2 : k8s services, load balancing and networking
In Kubernetes, a service is an entity that represents a set of pods running an application or functional component. The service holds access policies, and is responsible for enforcing these policies for incoming requests.
The need for services arises from the fact that pods in Kubernetes are short lived and can be replaced at any time. Kubernetes guarantees the availability of a given pod and replica, but not the liveness of individual pods.
This means that pods that need to communicate with another pod cannot rely on the IP address of the underlying single pod. Instead, they connect to the service, which relays them to a relevant, currently-running pod.
The service is assigned a virtual IP address, known as a clus terIP, which persists until it is explicitly destroyed. The service acts as a reliable endpoint for communication between components or applications.
How to Create a Kubernetes Service
A Kubernetes service can be configured using a YAML manifest. Here is an example of a service YAML:
apiVersion: v1
kind: Service
metadata:
  name: my-service
spec:
  selector:
    app: nginx
  ports:
  protocol: TCP
    port: 80
    targetPort: 8080
Here are important aspects of the service manifest:
metadata:name—this is the logical name of the service, which will also become the DNS name of the service when it is created.
spec:selector—the selector identifies which pods that should be included in the service. In this example, pods that have the label app: nginx will become part of the service.
spec:ports—a list of port configurations (there can be one or more). Each port configuration defines a network protocol and port number. Optionally, the port configuration can define a targetPort, which is the port the pod should send traffic to.
What are the Types of Kubernetes Services?
ClusterIP
- ClusterIP is the default service type in Kubernetes. It receives a cluster-internal IP address, making its pods only accessible from within the cluster. If necessary, you can set a specific clusterIP in the service manifest, but it must be within the cluster IP range.
Manifest example:
apiVersion: v1
kind: Service
metadata:
  name: my-clusterip-service
spec:
  type: ClusterIP
  clusterIP: 10.10.5.10
  ports:
 —name: http
    protocol: TCP
    port: 80
    targetPort: 8080
NodePort
A NodePort service builds on top of the ClusterIP service, exposing it to a port accessible from outside the cluster. If you do not specify a port number, Kubernetes automatically chooses a free port. The kube-proxy component on each node is responsible for listening on the node’s external ports and forwarding client traffic from the NodePort to the ClusterIP.
By default, all nodes in the cluster listen on the service’s NodePort, even if they are not running a pod that matches the service selector. If these nodes receive traffic intended for the service, it is handled by network address translation (NAT) and forwarded to the destination pod.
NodePort can be used to configure an external load balancer to forward network traffic from clients outside the cluster to a specific set of pods. For this to work, you must set a specific port number for the NodePort, and configure the external load balancer to forward traffic to that port on all cluster nodes. You also need to configure health checks in the external load balancer to determine whether a node is running healthy pods.
The nodePort field in the service manifest is optional, and lets you specify a custom port between 30000-32767.

Manifest example:
apiVersion: v1
kind: Service
metadata:
  name: my-nodeport-service
spec:
  type: NodePort
  selector:
    app: nginx
  ports:
 —name: http
    protocol: TCP
    port: 80
    targetPort: 8080
    nodePort: 30000
LoadBalancer
A LoadBalancer service is based on the NodePort service, and adds the ability to configure external load balancers in public and private clouds. It exposes services running within the cluster by forwarding network traffic to cluster nodes.
The LoadBalancer service type lets you dynamically implement external load balancers. This typically requires an integration running inside the Kubernetes cluster, which performs a watch on LoadBalancer services.

Manifest example:
apiVersion: v1
kind: Service
metadata:
  name: my-loadbalancer-service
spec:
  type: LoadBalancer
  clusterIP: 10.0.160.135
  loadBalancerIP: 168.196.90.10
  selector:
    app: nginx
  ports:
 —name: http
    protocol: TCP
    port: 80
    targetPort: 8080
ExternalName
An ExternalName service maps the service to a DNS name instead of a selector. You define the name using the spec:externalName parameter. It returns a CNAME record matching the contents of the externalName field (for example, my.service.domain.com), without using a proxy.
This type of service can be used to create services in Kubernetes that represent external components such as databases running outside of Kubernetes. Another use case is allowing a pod in one namespace to communicate with a service in another namespace—the pod can access the ExternalName as a local service.
Manifest example:
apiVersion: v1
kind: Service
metadata:
  name: my-externalname-service
spec:
  type: ExternalName
  externalName: my.database.domain.com
What is Kubernetes networking?
Kubernetes networking is the mechanism by which different resources within and outside your cluster are able to communicate with each other.
Networking handles several different scenariosbut some key ones include communication between Pods, communication between Kubernetes Services, and handling external traffic to the cluster.
Because Kubernetes is a distributed system, the network plane spans across your cluster’s physical Nodes. It uses a virtual overlay network that provides a flat structure for your cluster resources to connect to.
Below is an example of a Kubernetes networking diagram:
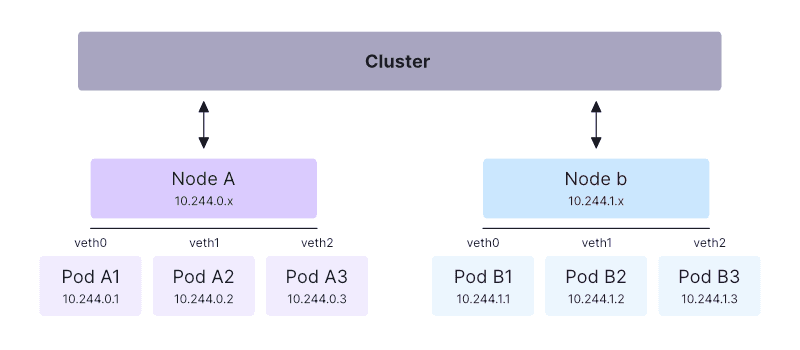
The Kubernetes networking implementation allocates IP addresses, assigns DNS names, and maps ports to your Pods and Services. This process is generally automatic—when using Kubernetes, you won’t normally have to manage these tasks on your network infrastructure or Node hosts.
At a high level, the Kubernetes network model works by allocating each Pod a unique IP address that resolves within your cluster. Pods can then communicate using their IP addresses, without requiring NAT or any other configuration.
This basic architecture is enhanced by the Service model, which allows traffic to route to any one of a set of Pods, as well as control methods, including network policies that prevent undesirable Pod-to-Pod communications.
Connect With Me
Thank you for reading. I hope you were able to understand and learn something new from my blog.
Happy Learning!


